
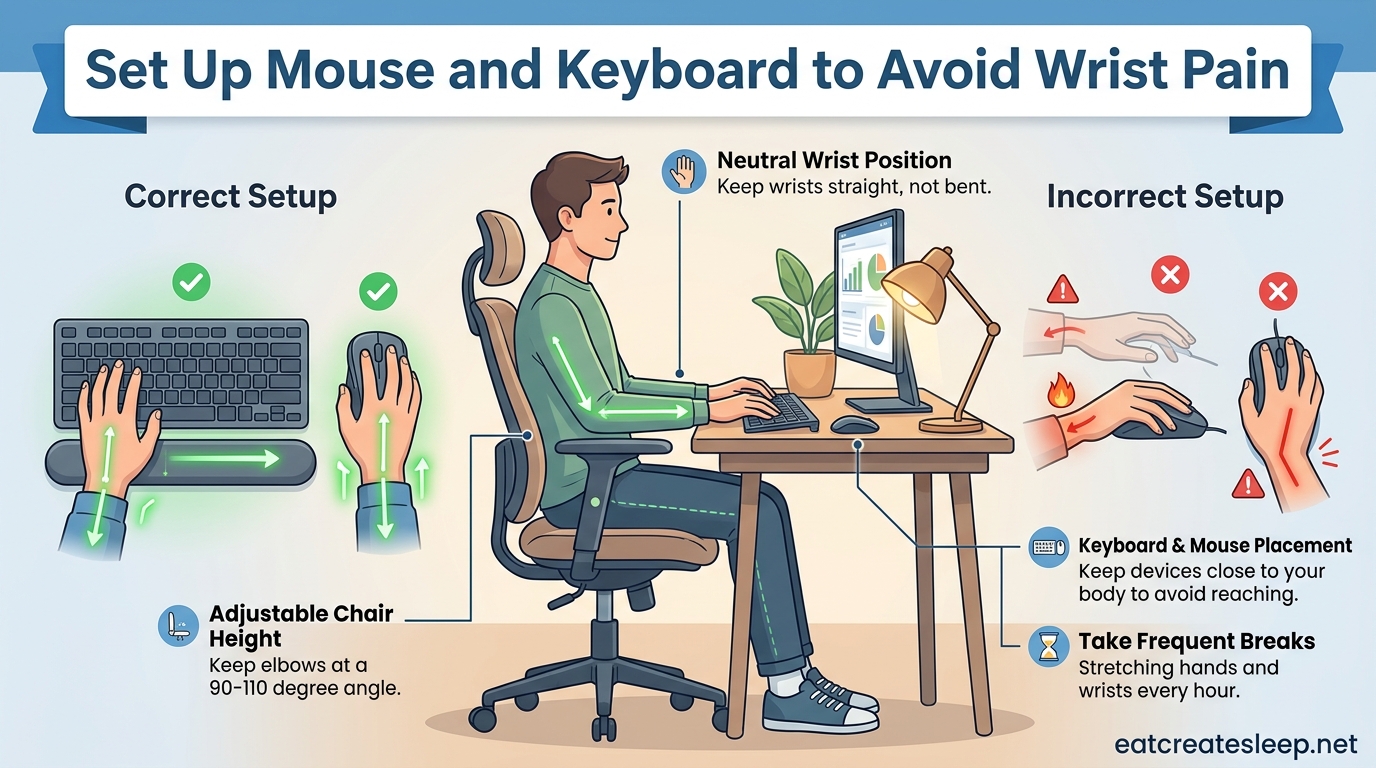
If you spend more than a couple of hours a day at a computer, wrist pain can sneak up on you fast. The ache in your forearm, the tingling in your fingers, the stiffness when you open a jar — these are all signs your workstation is fighting against your body. The good news is that most wrist pain from typing and mouse use is preventable, and it usually comes down to how your equipment is positioned.
This guide walks you through exactly how to set up your mouse and keyboard to avoid wrist pain using a simple four-step process backed by ergonomics research and recommendations from OSHA and the American Physical Therapy Association. You will also find a quick five-point self-check, specific stretches you can do at your desk, and clear guidance on when wrist pain warrants a visit to a professional.
Whether you are an office worker, a remote professional, a student, or a gamer, the principles below apply to anyone who uses a keyboard and mouse regularly. I have organized everything so you can read it once, fix your setup in about ten minutes, and feel the difference the same day.
Table of Contents
Why Wrist Pain Happens at the Keyboard
Wrist pain from computer work is almost always caused by repetitive strain combined with poor posture. When your wrists sit in a bent or extended position for hours, the tendons that run through the carpal tunnel have to work harder with every keystroke and every mouse movement. Over time, those tendons become inflamed and swell, which compresses the median nerve and causes pain, numbness, and tingling.
There are two wrist positions that cause the most trouble. Wrist extension means your hands are bent upward toward the ceiling, which is what happens when your keyboard is too high or too tilted. Wrist flexion means your hands are bent downward, often caused by gripping a mouse too tightly or resting your palms on a hard desk edge while typing. Both positions strain the tendons and nerves in your forearm and wrist.
The fix is not complicated. You need to keep your wrists in what ergonomists call a neutral position — a straight line from your forearm through your wrist to your hand, with no bending up, down, or sideways. The rest of this guide shows you how to get there.
The 5-Point Quick Self-Check
Before you change anything, take 30 seconds to assess your current setup. Sit at your workstation the way you normally would and check each item below. If you answer no to any of these, the following sections will show you how to fix it.
- Are your feet flat on the floor (or on a footrest) with your knees at roughly 90 degrees?
- Are your elbows at your sides bent between 90 and 100 degrees, with your forearms parallel to the floor?
- Is your keyboard close enough that you can type without reaching forward?
- Is your mouse right next to the keyboard, within easy reach without stretching your arm?
- Are your wrists straight when you type, not bent up, down, or outward?
If you answered yes to all five, you are already in good shape. Most people miss at least two, and those two are usually the source of the pain. Let’s fix them now.
How to Set Up Your Mouse and Keyboard to Avoid Wrist Pain: The 4-Step Process
Learning how to set up your mouse and keyboard to avoid wrist pain follows a specific order, because everything starts from your chair. If your chair height is wrong, no amount of keyboard or mouse adjustment will fix the strain. Work through these steps in order and you will have a properly aligned workstation in under ten minutes.
Step 0: Start With Your Chair
Your chair sets the foundation for every other adjustment. Sit all the way back in your chair so your lower back is supported. Adjust the seat height so your feet rest flat on the floor and your knees are at roughly 90 degrees, or slightly more open. If your feet dangle, use a footrest rather than lowering the chair and compressing your legs.
Once your chair is set, check that your shoulders are relaxed and down, not shrugged up toward your ears. Shoulder elevation is a hidden cause of wrist pain because it changes the angle of your entire arm. If your armrests are too high, lower them or remove them so they do not push your shoulders up.
Watch out for: A chair that is too high forces you to reach down to your desk, which causes wrist extension. A chair that is too low makes you reach up, which strains your shoulders. Get this right first.
Step 1: Position Your Keyboard Close and Centered
Pull your keyboard toward you so the home row (the row with ASDF) is about 5 centimeters, or roughly two inches, from the edge of your desk. You should be able to type with your elbows staying at your sides, never reaching forward. The keyboard should sit directly in front of you, centered on the letters you type most, not centered on the whole keyboard including the number pad.
If you use a standard keyboard with a number pad on the right, the letter keys are actually shifted to the left of your body center. This forces your right arm outward every time you reach for the mouse. A compact keyboard without a number pad solves this problem by letting you center the letter keys directly in front of your chest.
Your keyboard should sit at about elbow height. If your desk is too high and you cannot lower it, raise your chair and use a footrest to keep your feet supported. A keyboard tray that mounts under the desk is another option, but make sure it sits at the right height — many trays are too low and cause wrist flexion.
The keyboard should also be flat, not propped up on its little feet. Those feet tilt the keyboard toward you and force your wrists into extension. If anything, a slight negative tilt (where the top of the keyboard is lower than the bottom) is better for your wrists than a positive tilt.
Watch out for: Typing on a laptop keyboard for long stretches. Laptop keyboards are flat and low, which forces your wrists into awkward angles and your shoulders into a hunch. If you work on a laptop daily, plug in an external keyboard and raise the laptop on a stand so the screen is at eye level.
Step 2: Maintain Neutral Wrists While Typing
Neutral wrist position means your hand and forearm form a straight line, with no bend at the wrist joint. Picture a ruler resting flat on your forearm and continuing straight onto the back of your hand — that is neutral. When you type, your wrists should float just above the desk or rest very lightly, never pressing down.
Many people plant their wrists on the desk or on a wrist rest and then bend their hands upward to reach the keys. This is wrist extension, and it is one of the most common causes of typing-related wrist pain. Instead, let your hands float while you type and only rest them between bursts of typing. Your forearms should do the support work, not your wrists.
Keep your hands also aligned with your forearms from side to side. Your wrists should not bend outward (ulnar deviation) toward the pinky side, which happens when you reach for keys at the edges of the keyboard or when you use a mouse that is too far to the right. A split keyboard can help if your wrists naturally angle outward, but the first fix is simply awareness of where your hands are.
Watch out for: The habit of planting your wrists and then twisting your hands to reach keys. If you notice your wrists are bent in any direction while you type, pause and reset your hand position.
Step 3: Keep Your Elbows Relaxed at Your Sides
Your elbows should hang naturally at your sides, bent between 90 and 100 degrees. This angle keeps your forearms roughly parallel to the floor and your wrists in a neutral position without any extra effort. If your elbows are pushed out away from your body, your shoulders are doing unnecessary work and your wrists will compensate.
Check this by typing normally for a minute and then freezing in place. Look down at your arms. Are your elbows tucked in? Are your shoulders down and relaxed? If your elbows are winged out or your shoulders are crept up toward your ears, your chair height or desk height probably needs adjustment.
Armrests can help here, but only if they support your forearms at the right height. If your armrests are too high, they push your shoulders up. If they are too low or too far apart, they are useless. Adjustable armrests set to support your forearms at desk height, with your shoulders relaxed, are ideal.
Watch out for: Reaching forward to type or use the mouse. If your keyboard or mouse is too far away, your elbows come off your sides, your shoulders roll forward, and the strain travels all the way down to your wrists.
Step 4: Position Your Mouse Right Next to the Keyboard
Your mouse should sit directly next to your keyboard, at the same height, within easy reach so you can grab it without extending your arm outward. The number one cause of mouse-related wrist pain is reaching — when the mouse sits too far to the right or too far forward on the desk, every click forces your shoulder and wrist into a strained position.
If you use a compact keyboard without a number pad, your mouse can sit almost touching the keyboard. If you use a full-size keyboard, consider moving the mouse closer by removing the number pad section or switching to a keyboard that lets you reposition it. The goal is to minimize the distance between your typing position and your mousing position.
Grip matters too. Many people grip their mouse too tightly without realizing it, which keeps the forearm muscles under constant tension. Hold the mouse loosely, with just enough pressure to control it. If your knuckles are white or your forearm is tense while you mouse, you are gripping too hard.
Your mouse should also be the right size for your hand. A mouse that is too small forces you to grip harder to control it. A mouse that is too big forces your hand into an awkward arch. If your hand cramps after a few minutes of mousing, try a different size or shape.
Watch out for: Squeezing the mouse when you are stressed or concentrating. This is a common habit and a major contributor to wrist pain. Notice it, relax your grip, and your forearm will thank you.
Wrist Rests: Helpful or Harmful?
Wrist rests are one of the most misunderstood ergonomic accessories. The key rule is this: a wrist rest is for resting between typing bursts, not for supporting your wrists while you actively type. If you plant your wrists on a rest and then bend your hands upward to reach the keys, the rest is actively causing wrist extension and making your pain worse.
Used correctly, a wrist rest (or more accurately, a palm rest) sits at the base of your keyboard and gives you a soft place to park your hands when you pause. The rest should be roughly level with the front edge of your keyboard, so your palms land on it without bending your wrists. When you start typing again, your hands lift off the rest and float while you work.
If you do use a wrist rest, choose one with a soft, rounded surface rather than a hard plastic edge. A hard edge creates pressure points on the underside of your wrist, right where the carpal tunnel sits, which is exactly what you want to avoid.
Stretches and Movement Breaks
No setup, however perfect, can protect your wrists if you sit motionless for hours. Movement is essential because it restores blood flow, reduces inflammation, and gives your tendons a chance to recover. Aim to take a short break every 30 minutes — even 60 seconds of stretching makes a measurable difference.
Try these specific stretches at your desk throughout the day:
- Wrist circles: Extend your arms in front of you and slowly rotate your wrists in circles, 10 times clockwise and 10 times counterclockwise.
- Tendon glides: Start with your hand open, then make a hook fist, then a full fist, then return to open. Repeat 5 times on each hand to keep the tendons in your carpal tunnel gliding smoothly.
- Forearm stretch: Extend one arm forward with the palm facing up, then use your other hand to gently press your fingers down toward the floor. Hold for 20 seconds and switch sides.
- Prayer stretch: Press your palms together in front of your chest with your fingers pointing up, then slowly lower your hands toward your waist while keeping your palms pressed together. Hold for 15 to 30 seconds.
- Finger spreads: Spread your fingers as wide as you can, hold for 5 seconds, then relax. Repeat 10 times to relieve tension in your hand and forearm muscles.
Set a timer if you need to. Many desk workers find that a recurring 30-minute reminder is the single most effective change they can make for their wrist health. Stand up, roll your shoulders, do a couple of the stretches above, and sit back down. Your wrists, shoulders, and back will all benefit.
Equipment Upgrades Worth Considering
While no piece of equipment can fix a bad setup, the right tools can make a good setup more comfortable. If you have corrected your posture and positioning and still experience wrist pain, consider whether your keyboard or mouse is the problem.
A vertical mouse holds your hand in a handshake position, which keeps your forearm in a more neutral rotation and reduces the twisting that comes with a standard mouse. Many people with mouse-related wrist pain find significant relief within a week of switching. A trackball is another option — instead of moving the whole mouse, you move a ball with your thumb or fingers, which keeps your arm still and reduces shoulder and wrist strain.
A compact keyboard without a number pad lets you position your mouse closer to your body center, which reduces reaching. A split keyboard separates the left and right halves so your wrists can stay aligned with your forearms without angling outward. Both are popular among people with persistent wrist pain, though they take a week or two to get used to.
Start with the free fixes — posture, positioning, breaks — before spending money on new equipment. Most wrist pain improves dramatically with setup changes alone.
When to See a Doctor or Physical Therapist
Most wrist pain from computer work improves within a few weeks of correcting your setup and adding regular breaks. But certain symptoms are warning signs that you need professional help, not just a better chair.
See a doctor or physical therapist if you experience any of the following:
- Night pain that wakes you up or pain that persists even when you are not using your hands.
- Numbness or tingling in your thumb, index finger, or middle finger, which can signal compression of the median nerve.
- Weakness in your grip or dropping objects unexpectedly.
- Pain that does not improve after two to three weeks of ergonomic adjustments and rest.
- Swelling, redness, or warmth around your wrist joint, which may indicate inflammation beyond simple strain.
Physical therapy can be highly effective for wrist pain from typing. A therapist can assess your specific movement patterns, teach you targeted exercises like nerve gliding and manual therapy techniques, and help you build strength in the muscles that support your wrists. Many people recover fully without surgery when they address the problem early.
As for recovery timelines, mild wrist strain often improves in two to four weeks with proper ergonomics and stretching. More persistent cases, especially those involving nerve compression, can take several months. The sooner you fix your setup and start moving, the faster you will recover.
FAQs
How to play mouse and keyboard without wrist pain?
To play without wrist pain, start with your chair at the right height so your feet are flat and your elbows bend at 90 degrees. Pull your keyboard close so you do not reach, position your mouse directly next to the keyboard at the same height, and keep your wrists in a straight neutral line while typing. Take a 60-second break every 30 minutes to stretch.
How to stop wrist hurting when using a mouse?
Move the mouse closer to your keyboard so your arm stays relaxed at your side and you do not reach outward. Hold the mouse loosely without squeezing, and make sure the mouse is at elbow height. If your wrist still hurts, try a vertical mouse that keeps your forearm in a neutral handshake position.
How to prevent wrists from hurting from typing?
Keep your keyboard about 5 centimeters from the desk edge, flat or with a slight negative tilt, and at elbow height. Type with your wrists floating in a neutral position rather than planted on the desk or a wrist rest. Use a compact keyboard without a number pad so your mouse can sit closer, and stretch every 30 minutes.
Why do my wrists hurt when I type all day?
Typing all day with bent wrists causes the tendons in your carpal tunnel to become inflamed from repetitive motion. The inflammation compresses the median nerve, leading to pain, tingling, and numbness. The main culprits are wrists that are bent upward (extension) from a keyboard that is too high, or planted on a hard surface while typing.
Can wrist pain go away on its own?
Mild wrist strain from poor posture often improves on its own within two to four weeks once you fix your setup and take regular breaks. However, pain that involves numbness, tingling, night pain, or weakness may indicate nerve compression and will not fully resolve without targeted treatment. If symptoms persist beyond a few weeks, see a physical therapist.
How do I prevent carpal tunnel syndrome at work?
Prevent carpal tunnel by keeping your wrists neutral while typing, positioning your keyboard and mouse at elbow height, avoiding wrist extension, and taking movement breaks every 30 minutes. Use a light grip on your mouse, consider a compact or split keyboard, and do wrist stretches like tendon glides and wrist circles throughout the day.
What is the best ergonomic setup for typing?
The best ergonomic setup starts with a chair adjusted so your feet are flat and knees are at 90 degrees. Your keyboard sits flat about 5 centimeters from the desk edge at elbow height, your mouse is right next to the keyboard, your elbows stay at your sides bent 90 degrees, and your wrists float in a neutral position while typing.
Can physical therapy help wrist pain from typing?
Yes, physical therapy is highly effective for wrist pain from typing. A therapist can identify which tendons or nerves are involved, teach targeted exercises like nerve gliding and tendon glides, use manual therapy to reduce inflammation, and help you strengthen the muscles that support your wrists. Most cases improve significantly within a few weeks of guided treatment.
Wrapping Up
Learning how to set up your mouse and keyboard to avoid wrist pain comes down to four simple moves: fix your chair height, pull your keyboard close, keep your wrists neutral, and position your mouse right next to the keyboard. Add 30-minute movement breaks and a few targeted stretches, and you have addressed the vast majority of preventable wrist pain.
Start with the free fixes today — posture, positioning, and breaks. If pain persists beyond a few weeks or you notice numbness, tingling, or weakness, do not wait. See a physical therapist who can help you recover before the problem becomes chronic. Your wrists work hard for you every day. Give them the setup they deserve, and they will keep you typing comfortably for years to come.