
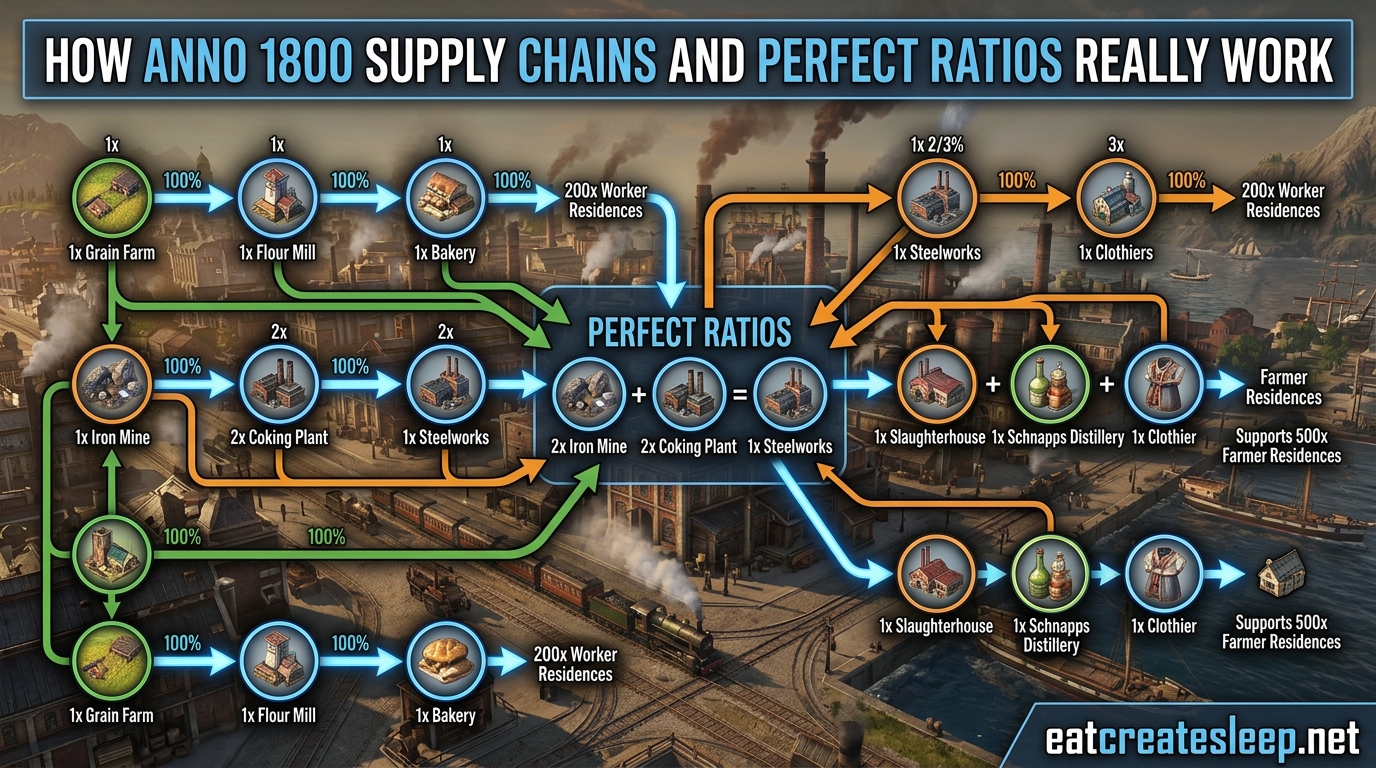
If you have ever stared at an Anno 1800 city full of angry farmers and wondered why the bakery ran dry, you are not alone. The single most asked question on the Anno 1800 subreddit boils down to a confession I see again and again: “I’m shit at maths, can someone just tell me how many farms I need?”
This guide exists to fix that. We are going to break down exactly how Anno 1800 supply chains and “perfect ratios” really work, using plain English instead of spreadsheet jargon. By the end you will know how to read the production menu, do the simple math behind a ratio, and spot the reason a chain has stopped before your residents start rioting.
You do not need to be good at math. You just need to understand one small idea: every building in Anno 1800 has a production speed, and matching those speeds is what players call a “perfect ratio.” Once that clicks, the whole game opens up. The wiki looks intimidating, but it is just the same comparison repeated for every chain in the game.
What makes Anno 1800 supply chains feel overwhelming is the sheer number of moving parts. Workforce tiers, fertilities, cart capacity, trade routes, electricity, and item effects all stack on top of each other. But peel those away and the core is one simple idea you can learn in five minutes. Let’s get into it.
Table of Contents
What Are Anno 1800 Supply Chains?
An Anno 1800 supply chain is a connected series of production buildings where the output of one building becomes the input for the next, ending in a finished good your population consumes. The classic example is bread: a grain farm grows grain, a mill turns grain into flour, and a bakery turns flour into bread. Three buildings, one chain, one finished product.
Each link in the chain produces goods at a different speed, and that is where the trouble starts. A grain farm produces grain on its own cycle, the mill has a different cycle, and the bakery has a third. If those speeds do not line up, you end up with either a stockpile of unused grain rotting in a warehouse or a bakery sitting idle waiting for flour that never arrives.
When the speeds do line up, every building runs at full productivity without piling up mountains of unused input or starving the next link. That balance is what players call a “perfect ratio.” It is not a hidden mechanic or a developer secret; it is just the natural result of matching production rates across the chain.
When a chain is unbalanced, you get one of two outcomes, both bad. Shortages mean angry residents who eventually move out and tank your income. Overproduction means wasted workforce, wasted building upkeep, and a slow money leak that explains why your treasury keeps sliding toward zero. The entire economic puzzle of Anno 1800 is really just this one concept scaled up across dozens of chains.
Supply chains also branch and merge. The beer chain merges two raw materials at the brewery. The steel chain branches at the steelworks into multiple possible finished goods. Once you understand a single straight chain like bread, the branching ones are just more of the same logic applied in parallel.
How the Production Cycle Actually Works
Every production building in Anno 1800 works the same way under the hood. It pulls input goods from a small internal input storage, runs them through a fixed cycle time, and drops the finished good into an output storage. A cart then hauls that output to the next building or to a warehouse.
Here is the part that confuses new players: the cycle time is not the production rate. A bakery with a 30-second cycle time does not necessarily produce faster than a mill with a 60-second cycle, because each cycle produces a different amount. The bakery might pop out 1 ton of bread per cycle while the mill spits out 2 tons of flour per cycle. You have to look at both numbers.
What you actually care about is the tons-per-minute figure, which already accounts for cycle time and output per cycle. The game shows this number directly in the production menu when you hover over the output icon. That single number is the entire foundation of ratio math, and it is the only number you need to compare buildings.
Each building also shows two small storage bars in its menu: the blue input bar and the brown output bar. If the input bar is empty and the building is idle, the chain upstream is broken. If the output bar is full and the building is idle, the chain downstream is jammed. Reading those two bars solves about 80 percent of all production problems in the game.
A common mistake is assuming more buildings always means more output. If the cart cannot move goods fast enough, or the input storage cannot hold enough, doubling the number of factories does nothing except waste money. The bottleneck simply moves from one building to the next, and total output stays the same. You have to find the actual bottleneck first.
Cycle time also matters when comparing buildings across the same chain, because a long-cycle building with a big output per cycle can match a short-cycle building with a small output per cycle. Always reduce everything to tons per minute before comparing, and the comparison becomes trivial.
Understanding Productivity and Production Rate
Productivity is the percentage a building runs at, shown in big numbers on the building card. At 100 percent productivity, a building runs its full cycle as fast as the game allows. At 50 percent, it takes twice as long to produce the same amount. Most buildings start at 100 percent and can be pushed higher or dragged lower by modifiers.
Production rate is the actual speed goods come out, measured in tons per minute. This is the number that matters for ratio math, because ratios are just two production rates compared. If a grain farm produces 1 ton per minute and a bakery consumes 1 ton per minute, the two are balanced one to one.
The formula is simple: production rate equals output per cycle divided by cycle time, multiplied by productivity. The Anno 1800 wiki lists both numbers for every building, and the production menu shows you the tons-per-minute value directly if you hover the output icon. You rarely need to do the math yourself.
Here is the key distinction players miss: productivity is what the building is capable of, production rate is what it actually delivers. A building sitting at 100 percent productivity but with empty input storage has a real production rate of zero. That gap between potential and actual output is where most inefficiency hides.
Productivity below 100 percent is almost always a sign of a problem. Common causes include missing modules on a farm, wrong fertility on the island, understaffed workforce, or a depleted mine. Walk through the list before assuming the building is just slow.
Productivity above 100 percent is possible and is where the late game shines. Electricity, trade union items, and modules can all push a building past its base rate. A building running at 200 percent productivity produces twice its listed tons per minute, which is exactly as powerful as it sounds.
Whenever you see a productivity number other than 100, your ratio math changes. A grain farm at 150 percent productivity feeds more bakeries than a grain farm at 100 percent. Always re-read the tons-per-minute value after any modifier change, because the menu updates it automatically.
How to Calculate Perfect Ratios in Anno 1800
Here is the part Reddit told us players struggle with. Forget the spreadsheets for a second. The ratio formula is just one comparison, and it works the same way for every chain in the game.
The Anno 1800 perfect ratio rule: divide the production rate of the consumer by the production rate of the producer. That tells you how many producers each consumer needs. Flip the fraction if you want to know how many consumers one producer can feed.
Let me walk you through the bread chain step by step so the math is concrete. This same walkthrough works for any chain in the game.
Step 1: Find the production rate for each building. Open the production menu or hover the output icon. A grain farm produces roughly 1 ton of grain per minute. A mill produces 1 ton of flour per minute but consumes 1 ton of grain to do it. A bakery produces 1 ton of bread per minute but consumes 1 ton of flour.
Step 2: Compare rates link by link. Grain farm to mill is 1 to 1, because both produce 1 ton per minute. Mill to bakery is also 1 to 1. So the entire bread chain is a clean 1:1:1 ratio, which is why it is the chain most players learn first.
Step 3: When rates do not match, multiply. Say your sawmill produces 2 tons of wood per minute and the framework knitter consumes 1 ton per minute. You need one sawmill feeding two knitters, written as 1:2. If a mine produces 4 tons of ore per minute and a smelter consumes 2 tons, that is 1 mine to 2 smelters.
Step 4: Always check the in-game menu first. The game shows you tons per minute directly. You almost never need to calculate from cycle time unless a trade union item is modifying output, in which case the menu updates automatically.
Step 5: Round up, never down. If the math gives you 1.5 farms per bakery, build 2 farms. Slight overproduction is harmless and feeds a buffer that absorbs small demand spikes. Slight underproduction causes cascading shortages that are painful to debug.
Step 6: Account for branching chains. When two raw materials feed one consumer, balance each upstream chain separately. The brewery consumes both malt and hops, so calculate grain-to-malt and hops-to-brewery as two independent ratios.
Step 7: Recalculate after every modifier change. Electricity, items, and modules all shift production rates. If you electrify one building in a chain, re-read its tons per minute and redo the comparison. A previously perfect 1:1 ratio can become 1:2 overnight.
That is the entire system. The wiki’s “perfect ratios” page looks intimidating because it lists every chain at once across hundreds of lines, but each individual line is just the same comparison you just did. Once you can read tons per minute off the menu, you can build any chain from scratch without ever consulting a sheet.
The community spreadsheets exist because looking up every chain individually is tedious, not because the math is hard. Bookmark one for reference if you like, but understand the underlying comparison and you will never need to memorize a single line.
Common Production Chain Examples
Here are the ratios players ask about most often, pre-calculated so you can copy them straight into a new save. All numbers assume 100 percent productivity with no item modifiers, no electricity, and full modules where applicable.
The Bread Chain (Farmers)
Bread is the cleanest chain in the game: 1 grain farm feeds 1 mill feeds 1 bakery. Three buildings, perfectly balanced, output of 1 ton of bread per minute. This is the chain to practice on if ratios are new to you.
Place all three buildings close to a warehouse so cart travel time stays short. Add grain modules to the farm to push productivity above 100 percent, and the chain still stays balanced as long as you apply the same boost to the mill and bakery.
The Beer Chain (Workers)
Beer is where the math gets interesting. You need grain from farms, hops from hop fields, and a brewery combining them. The standard ratio is roughly 2 grain farms plus 2 hop fields feeding malthouses and breweries. The malthouse processes grain into malt, and breweries combine malt and hops into beer.
Players frequently mess this one up because both inputs enter at the same step. Always confirm each input has its own balanced upstream chain before combining them. If malt is short, the brewery starves no matter how many hops you stockpile.
Beer is also one of the most profitable worker-tier goods, so getting this chain right early pays dividends for the rest of the game. Build it on an island with grain fertility for the grain farms.
The Work Clothes Chain (Farmers)
Work clothes use wool from sheep farms and a framework knitter to produce the finished good. The ratio is roughly 2 sheep farms feeding 1 framework knitter. Sheep farms are slow, so the 2:1 ratio surprises new players who assume one farm is enough.
Work clothes are the first chain most players overproduce, because the demand feels constant early on. Match the chain to actual Farmer population, not a guess, and check the statistics menu to confirm production is slightly above consumption.
The Brick Chain (Basic Resources)
This is the most asked-about ratio on the subreddit. The clay pit to brick factory ratio in Anno 1800 is 1 clay pit feeding 1 brick factory at base productivity. Both produce at matching rates, so the chain is 1:1.
If you push the brick factory to 150 percent productivity with electricity, you will need a second clay pit to keep up. This is a perfect example of why modifiers force a recalculation: the base ratio is trivial, but the modified ratio breaks the moment you electrify only one side.
The Steel Chain (Advanced Resources)
Steel is a two-stage chain that branches. A furnace consumes iron ore and coal to produce steel, then a steelworks turns steel into weapons or sewing machines. The ratio is roughly 2 iron mines plus 2 coal mines feeding 2 furnaces, with downstream steelworks matched to whatever finished good you are producing.
Steel chains belong on islands with iron and coal deposits, ideally the same island to avoid trade route complexity. The branch at the steelworks means you can pivot between weapons for military quests and sewing machines for population demand without rebuilding the upstream chain.
The Rum Chain (New World)
Rum is one of the first chains you build in the New World and a strong export to the Old World. Sugar cane farms feed a distillery that produces rum directly. The ratio is roughly 2 or 3 sugar cane farms per distillery, depending on module placement.
Rum is a great example of a single-input chain where the ratio math stays simple. The complexity comes from logistics: getting the rum back to your Old World population through trade routes.
Logistics: Carts, Warehouses, and Transport
Perfect ratios assume goods actually move between buildings. That is the job of carts, and understanding cart logistics is what separates a balanced chain on paper from one that actually runs at full speed in practice.
Every production building and warehouse comes with carts that auto-haul goods within range. Horse carts are the default early game and are slow. Faster carts unlock as you progress through population tiers. A building with a full output bar and no cart available is a stalled building, no matter how good your ratios are on paper.
The number of carts matters too. A single cart can only carry one load at a time, so a busy district with many production buildings quickly outruns its cart capacity. Some buildings can be upgraded to add a second cart, and warehouses gain additional carts as they level up.
Warehouses act as hubs. Goods flow from production buildings to warehouses, then from warehouses to the next building or to a harbor for shipping. Warehouse range is limited, so a bakery sitting outside warehouse range has to rely on its own cart to fetch flour, which is much slower than a warehouse cart doing the run.
Load ramps matter as well. A warehouse with one ramp processes one cart at a time, so a busy district can bottleneck at the ramp itself. If you see carts queuing outside a warehouse waiting to unload, build a second warehouse nearby or upgrade the existing one to add ramps.
Keep production buildings close to their warehouse. Group related chains together so carts make short trips between grain farm, mill, and bakery rather than long treks across the island. Never put a producer on the far edge of your island if the consumer is on the opposite shore. Long cart trips are invisible waste that does not show up in any ratio calculation but quietly halves your effective output.
Island-to-island transport uses ships on trade routes rather than carts. The same logic applies: a balanced chain producing goods in the New World still has to reach your Old World population, and a single ship on a long route can bottleneck the entire economy. Always overprovision trade route capacity slightly.
Productivity Modifiers Explained
Once you have the base ratios down, modifiers let you squeeze more output from the same buildings. This is also where the math gets messier, because every modifier shifts the perfect ratio in a different direction.
Electricity. Late-game electricity boosts most production buildings to 100 percent extra output, doubling their tons per minute. If a chain was balanced at 1:1 before electricity, and you electrify both buildings, both double together and stay balanced. But if only the downstream building gets electricity, you suddenly need twice as many upstream producers to keep up.
Trade unions and items. Equipping items in a trade union changes production rates, input costs, or even substitutes one input for another. An item that makes a bakery 50 percent faster means it now consumes flour 50 percent faster, so your upstream mill ratio breaks unless you adjust. Read the item description carefully and recheck the menu afterward.
Modules. Many farm buildings accept modules, which are extra fields placed in range of the main building. Each module boosts productivity above 100 percent, and the menu shows the new total. Modules change the production rate, which changes the ratio downstream.
Fertility. Some crops only grow on islands with the right fertility. Without it, the building runs at a fraction of full speed or not at all. Always check the fertility icon in the top-left of the island menu before placing a farm that depends on it.
Workforce. A building without enough workers runs at reduced productivity. If your population upgraded tiers and left the Farmer pool empty, every Farmer-staffed building slows down. This is one of the most common causes of sudden production drops.
Whenever a modifier changes a building’s productivity, recalculate the affected link using the new tons-per-minute value from the menu. The game does the math for you and updates the displayed number; you just have to read the new value and rebuild the ratio comparison.
The advanced player’s workflow looks like this: place a chain, balance it at 100 percent, then layer modifiers one at a time, rechecking the menu after each change. Trying to balance a fully electrified, item-loaded chain from scratch is where players get lost.
Troubleshooting Common Production Problems
This is the section competitors skip and players actually need. If a production chain has stopped or your income is cratering, work through this checklist in order. Each item takes ten seconds to check and covers a distinct failure mode.
Problem: Building shows 0 production and is idle. Check the input storage bar first. If it is empty, the upstream building is not delivering. Walk the chain backward until you find the link that has stopped. Usually it is a farm with no fields placed, a mine that ran out of deposits, or a trade route that was interrupted.
Problem: Input bar is full but output bar is also full. The downstream link is jammed. The carts cannot move the output fast enough, usually because the warehouse is too far away, the warehouse ramp is overloaded, or the next building in the chain has stopped accepting goods. Fix the bottleneck downstream of the affected building.
Problem: Production runs but residents still complain about shortages. You are producing the good but not delivering enough to meet demand. Compare your tons-per-minute output against the consumption number shown in the residence menu. If consumption exceeds production, scale the chain up. If they match but the complaint continues, you have a distribution problem rather than a production problem.
Problem: You are constantly losing money. The most common cause is overproduction. Every running building costs upkeep in workforce and coins. If you have eight sawmills feeding two framework knitters, six sawmills are burning money for nothing. Match building counts to actual demand and pause or demolish the surplus.
Problem: Production worked fine and then suddenly stopped. Check workforce first. If your population upgraded tiers, lower-tier workforce may have dropped, leaving farms understaffed. Also check that a trade route supplying a raw material has not been interrupted by pirates, a rival AI, or a route you accidentally paused.
Problem: A chain that was balanced is now unbalanced after a change. You probably added a modifier. Did you recently electrify one building? Equip a trade union item? Place a module? Anything that changes productivity on one link shifts the ratio. Re-read the tons-per-minute value and adjust counts.
Problem: Residents are demanding a good you are not producing at all. This usually happens after a population tier upgrade unlocks a new need. Open the residence info panel to see the new requirement, then build the full chain from scratch using the same ratio math you already know.
Open the statistics menu (the chart icon at the top of the screen) and look at the production tab. It shows every chain with a plus or minus next to it, telling you at a glance whether you are over- or under-producing each good. This single screen solves most income problems before they become emergencies.
Use the statistics menu every few minutes once your economy gets large. A small imbalance in a chain multiplied across thousands of residents can swing your income by hundreds of coins per minute. Catching it early means a one-building fix; catching it late means a full rescue operation.
FAQs
What makes the most money in Anno 1800?
High-tier manufactured goods like sewing machines, pocket watches, and jewelry generate the most income per ton because they serve Investors and Engineers who pay a premium. Rum and canned goods are also strong earners in the mid game. Focus on chains that serve higher population tiers rather than selling raw materials.
What is the ratio of clay pit to brick factory in Anno 1800?
The clay pit to brick factory ratio is 1 to 1 at base productivity. One clay pit produces enough clay to keep one brick factory running at full speed. If the brick factory is boosted by electricity or items beyond 100 percent productivity, add a second clay pit to keep up.
Why am I constantly losing money in Anno 1800?
The most common cause is overproduction. Every running production building has an upkeep cost in coins and workforce, and if you have more buildings than demand requires, the excess drains your budget. Open the statistics menu, check the production tab, and shut down any chain showing a large surplus.
Does unemployment matter in Anno 1800?
Unemployment itself does not directly punish you, but it signals that you have more workforce than production buildings need. The real issue is usually the opposite not enough workforce of the right tier. If farms stop running, check whether you have enough Farmers to staff them, since upgrades move population into higher tiers and leave lower-tier jobs empty.
Wrapping Up: How Anno 1800 Supply Chains and Perfect Ratios Really Work
The entire system comes down to one move: read the tons-per-minute number off the production menu and compare it between any two linked buildings. That comparison is the ratio. Do it for every link in the chain, round up to be safe, and you have a balanced supply chain that will not stall.
You do not need spreadsheets, and you definitely do not need to be good at math. The game hands you the numbers; your only job is to match them. Once that clicks, troubleshooting stops being guesswork and becomes a quick walk up or down the chain checking storage bars and the statistics menu.
Start with the bread chain to practice, move on to beer and work clothes once 1:1 feels natural, and treat electricity and trade union items as fresh math problems whenever you add them. The in-game statistics menu is your best friend, because it does the addition for you and flags every chain that is out of balance. That is genuinely how Anno 1800 supply chains and “perfect ratios” really work underneath the intimidating wiki pages.